How to Install Security Cameras and Hide Wires

The process of installing a security camera depends on what type of camera you have and whether you want to do a bit of surveillance inside or outside of your home. But the basics are the same.

  1. Find a good spot for the camera (in a space where it won’t be tampered with).
  2. Place or mount the camera.
  3. Connect any necessary cords and plug the camera in.
  4. Connect your camera to Wi-Fi or an NVR.
Read on for tips on installing wired and wireless cameras and the best ways to hide cords.

Security camera installed outside

Installing a security camera

Home security camera installation can be pretty easy if you have a Wi-Fi device. Installing wired surveillance devices, like CCTV cameras, can be a little trickier. Ahead, we’ll walk you through both.

Where to install security cameras

Security camera placement should be the first thing you sort out before installation. Before installing a security camera, consider the best place for it. Generally speaking, it’s a good idea to place surveillance cameras in high-traffic areas: cameras in common spaces like kitchens and living rooms let you keep an eye on your cat when you’re out of town and check in on your kids before you make it home from work.

Other high-traffic areas, like hallways, are a good idea too. If a would-be-burglar breaks into your home through the bathroom, the security camera will be able to catch them when they start prowling around your place.

It’s a good idea to place cameras in high-traffic areas.

If you’re placing your home security cameras outdoors, the more bustling areas of your exterior, like your garage door or entry doors, need the most attention. Decide what you want to keep an eye on: Do you want to use motion detection to monitor your front door and make sure packages stay put? Or do you want to take advantage of a night vision camera to see what animal is having their way with your vegetable garden? Whatever you choose, make sure you find a spot for your camera that will give you a clear lay of the land.

Whether you’re installing inside or outside, it’s best practice to place your camera seven to 10 feet off the ground so it can’t be tampered with. And make sure your outdoor cameras are visible—they can be a significant deterrent to thieves.

How to install wireless security camera systems at home

Once you’ve found a location for your camera to live, test it to make sure it works—you don’t want to go through the trouble of installing security cameras just to find out they’re buggy.

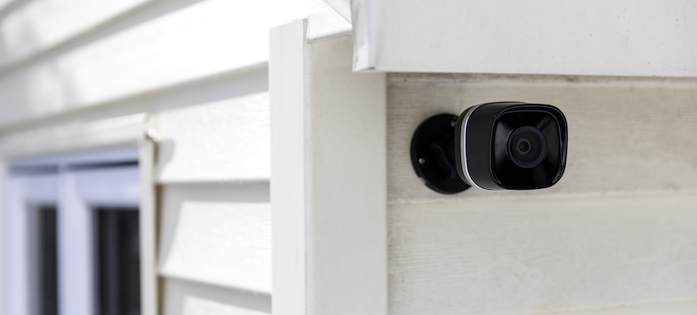
Internet protocol (IP) cameras, which are either powered by an outlet or batteries, are the easiest to install. These are the wireless security cameras you see most often, including outdoor cameras like the Nest Cam IQ and baby cameras like the Arlo Baby Monitor.

If you’re using an indoor IP camera, the installation process is pretty straightforward. Place your camera on a high bookshelf or in a corner to get a good field of view, plug it in, and connect it to Wi-Fi.

If you’re installing an outdoor IP camera, setup is still pretty easy—but it does require a bit more legwork. You’ll need a few tools: a pencil, a screwdriver, a hammer, and an electric drill. Here’s how you’ll do it.

1. Find a good spot on the wall.
Find a good spot on the wall

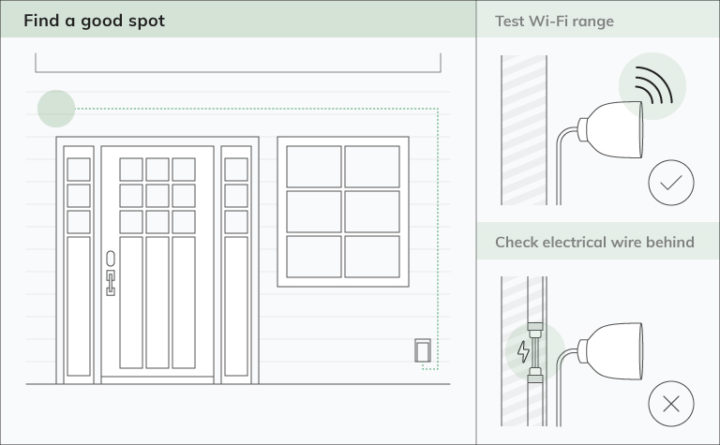
Test Wi-Fi strength and make sure your camera is in range of your home network. Make sure your camera is visible and that there aren’t any electrical wires behind the wall you’re drilling into. Double-check that you’re putting the camera close enough to an outlet for the cord to reach when you’ve run it discreetly through a cord cover or along the soffit (more on those below).

2. Use a pencil to mark where each screw should go. 
Use a pencil to mark where your camera will go.

Some cameras, like the Nest Cam IQ, will come with a mounting plate. Others, you’ll screw directly into the wall.

3. Use an electric drill to drill holes for each screw.
Use an electric drill to drill holes for each screw.

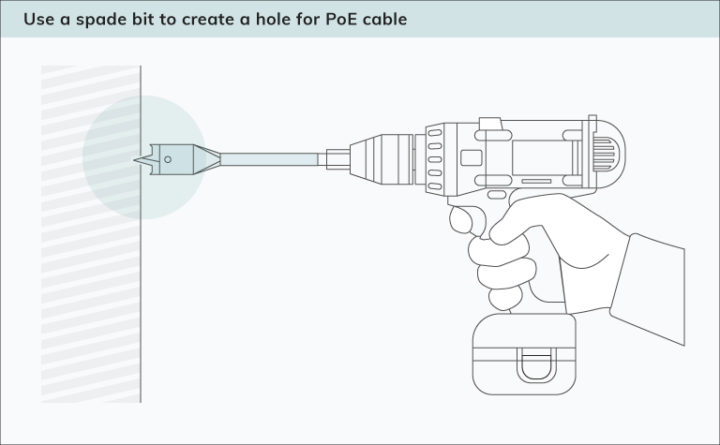
Make sure the drill bit matches the size of the screw you’re using. If you’re drilling into brick or stucco, you’ll insert anchors—which should be included with your security camera—into the drill holes by lightly tapping them in with a hammer. If you’re mounting your camera onto wood, you won’t need the anchors.

4. Use a screwdriver and mounting screws to attach the camera to the wall. 
Use a screwdriver and mounting screws to attach the camera to the wall.

If your camera has a mounting plate, screw it onto the wall, then place the camera on top.

5. Attach your camera to a power source.
Attach your camera to a power source.

Thread your wire along the walls of your home using cable clips or a staple gun, and plug into the nearest covered outdoor outlet. For extra safety, use a keyed padlock or combination lock to secure the outlet cover and make sure your camera stays plugged in.

Heads Up

These steps may change a bit depending on your setup. If you’re installing an HD camera onto your garage, you may opt to thread the wires inside and use an outlet there. After you’ve picked a spot for your camera, drill a hole on each side of the wall, then use fish tape to pull the cable through to the other side. Then, you’ll start at step two in order to get the camera mounted and plugged in.

ASL Insider Tip
Protip
Using a staple gun to secure wires to your home? Be sure that you’re stapling around the wires, not into the wires. Otherwise you could damage your cable.

How to install security camera wiring

If you have a CCTV camera, the installation process is more involved. CCTV surveillance cameras use a Power over Ethernet (PoE) cable to connect to a network video recorder (NVR), so you’ll have to thread the cord from the camera to wherever your receiver is.

That means if your receiver is in your basement office and your camera is at your front door, installation might get a little complicated. More than likely, you’ll have to thread the cable through your basement.

The process of installing a CCTV camera is similar to installing IP cameras, but you’ll need a few more tools: a spade bit, fish tape, and, most likely, a little bit of flexibility.

How to set up a security camera with a PoE cable

1. Find a spot where your camera will live.
Find a good spot on the wall.
2. Use a pencil to mark the perimeter of your camera, where the screws will go, and the center of where your camera will be mounted. 

Some cameras will come with a drill template to give you an idea of where you should drill.

Mark where your camera will go
3. Use a spade bit to create a larger hole that you can feed your PoE cable through.

If you don’t have a spade bit, you can use a larger drill bit you have on hand.

Use a spade bit and drill into the markings.
4. Run the cabling through your walls.

You’ll have to feed the PoE wire through the walls of your ceiling or basement, then thread it into the room with your receiver. Fish tape is super helpful here since it’s flexible and able to get through long, tight spaces. Depending on the setup of your home, you may also need to use extender cables.

Feel cabling through your walls.
5. Install your camera.

Once you’re done running wires, you can attach the ethernet cable to your camera, mount it, then attach the other side of the cord to your NVR.

Install your camera

How to hide security camera wiring outside

If you don’t love the idea of drilling a bunch of holes in your home—or if you’re a renter—you can use cable raceways and other tools to make your security camera’s wires less visible.

Cord covers

Cord covers can make your camera’s wiring more discreet. If you’re running your wires along the siding of your house, you can easily attach these inexpensive covers, also known as cable raceways, on top of them. Most covers come in white, but you can paint over them to make them match the surface they’re on.

Soffit

The soffit is what covers the underside of your roof and protects your eaves and attic space from harsh weather. You can hide your camera’s cable along the edging of the soffit.

Roof Soffit

Wire-free cameras

You can also opt for completely wireless security cameras that run on batteries, like the Blink XT2. This camera has a lot of the same features as wireless IP cameras, like two-way audio and night vision. Just be sure to change the batteries out as needed.

Conclusion

Whether you’re installing a night vision–enabled camera for your garage or an indoor cam as part of your security alarm system, DIY security cameras are typically easy to set up. Once installed, a security camera can be a great way to keep an eye on your family and any unwanted visitors.